Technical Support

Excel & IntegriSign (ePad)

The Basics

When you install IntegriSign, it automatically includes a plug-in for Excel. This appears as a few icons in the Add-Ins menu. The first button is to insert a signature field, the second to begin your signature.


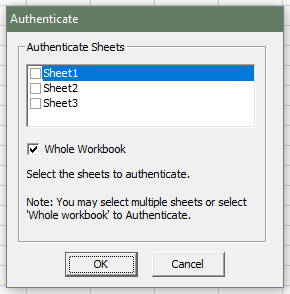
Inserting a signature field and starting the signing process will bring up a new window, the authentication screen. Here you can select which of the pages in your Excel spreadsheet the signature should apply to. This basically tells the IntegriSign object which of the pages to check for alterations.

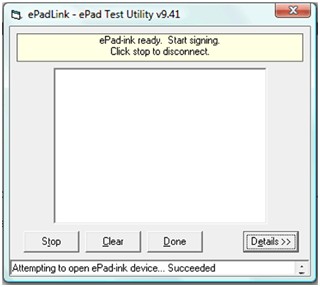
Once this is done, capture the signature normally – add your name in the IntegriSign pop-up box, and then sign on the ePad. After this, if the authenticated page is tampered with, the signature becomes invalid.

Multiple Signatures

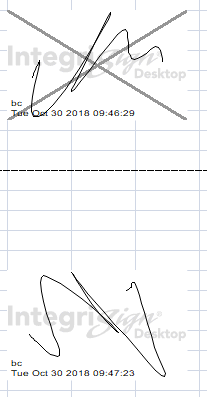
If you try to capture multiple signatures onto the same Excel worksheet, you will invalidate the first signature as it detects the alterations made to the page, and recognises it as different to when the signature was captured.


Signature Removal

If you do intend to capture several signature onto the same page, or if the page requires regular updating, then you would be best suited to remove the old signature before you apply a new one. This is done in Excel’s Design Mode, accessed using the icon at the top of the page bearing a pencil, ruler, and protractor.

Simply click this icon, then the IntegriSign object, and press Delete. The signature will disappear, and you can place a new one in its place.

Capturing Mulitple Signatures Without Invalidation

If you are using Excel and IntegriSign to track, for example, deliveries, then to prevent invalidation, you should really use a new page for each delivery, with just one signature per page, authenticating each signature to the page it appears on.

I would also recommend that, if you are using this method, you regularly switch to a new Excel spreadsheet, maybe a new spreadsheet each week, or month, depending on how often you need to capture signatures.

Apart from the invalidation issue mentioned above, the other reason to limit the number of signatures in a spreadsheet is because each one makes the file bigger. This in turn means it takes longer to validate the document before signing, and longer for the spreadsheet to load until it becomes more of a drain on your system.

Alternatives

If you are intending on using the ePad for such a purpose, then I would recommend that, instead of using Excel, you use Access. It will take a little work to set up a database, but there are samples included in the IntegriSign install to show how to capture signatures and store them. This will allow for an ongoing, single repository for the signatures you capture.

The other alternative is to use IntegriSign in Excel to convert any signature you capture into a signature string. This will require coding, although it can be done in Excel’s VBA programming environment.

Out of the two though, I would recommend the Access database. It is easier to configure, and can handle a lot more signatures before you start to notice it slowing down.

SDK (Software Developers’ Kits) – What can They Do?

SDK Building Blocks

There is a small amount of confusion over which SDK is best suited for use with a particular product, or for a particular application. In this article, I will look at the various developers’ kits that are available for our products, the programming languages they support, and what they are capable of.

Wacom’s Signature SDK for Windows

This kit allows a developer to incorporate biometric signature capture into their application. Signatures are stored in a format that allows for later analysis by qualified authorities, such as forensic document examiners, using a specialised application designed for just his purpose. This works with any of Wacom’s range of signature pads, pen tablets, or pen displays, like the DTU-1141.

This kit is simple to integrate, and automatically renders digital ink, displays dialog boxes, and captures complete biometric signature data. It can be used with a number of programming languages, including C, C++, C#, HTML/Javascript, Java, VB.NET, and Delphi.

The Signature SDK for Windows is used with Wacom’s STU series of signature pads.

Wacom’s Signature SDK for Android

Much the same as the above kit, this one is expressly designed to work with Android devices, and programming environments. Currently, the only supported language for this kit is Java.

Wacom’s STU SDK

Also known as the Low Level SDK, this allows any of Wacom’s STU series signature pads to be used to capture pen data. It requires more effort than the Signature SDK, but it allows unrestricted access to the data which can be stored in any suitable format. Applications can be made using this kit which are capable of uploading graphical images to the pad display, as well as recording pen movement, including pressure and timing, which is essential to compile handwritten biometric signature data.

This kit can be used with C, C++, C#, HTML/Javascript, Java, VB.NET, and Delphi.

Wacom’s iOS SDK

This kit is specifically designed for use with Wacom’s Bluetooth pens, such as the Bamboo Fineline Stylus, available in our shop. It provides features such as pressure sensitivity, palm rejection, and shortcut buttons, and can be easily integrated into your app for a traditional pen-on-paper feel.

While this SDK is constantly undergoing improvement and upgrade to keep it in line with current technology releases, it is currently optimized for use with the iPad Mini, generations 1, 2, 3, and 4, and the iPad Air, generations 1 and 2.

Wacom’s Wintab SDK

The DTU interactive displays are programmed using Wintab. The DLL which accepts the Wintab API is installed as part of the Wacom tablet drivers. There is no need to download any further software packages, everything is included in the initial install.

ePadLink’s IntegriSign SDK

For use with all of ePadLink’s products, this kit comes as part of the IntegriSign Desktop software package. It contains a number of samples to demonstrate the various capabilities of the ePad range, in a number of languages including ASP.NET, VB.NET, C#, and Visual Basic 6.0.

Signing my ePad in Word opens up a Visual Basic programming screen

ePad Ink

In Microsoft office, if I double-click an IntegriSign box to begin signing a document, my screen changes to a Visual Basic programming screen. What has happened and how do fix it?

When you are designing a new document in Word, or spreadsheet in Excel, you will need to use something called ‘Design Mode’ which allows greater control over editing the appearance of the page. The Visual Basic screen pops up when you try to start signing because your application is still in Design Mode. To cancel this, go to the Developer menu along the top of Word/Excel, and click the button (which should be highlighted) which reads ‘Design Mode’. This should fix your issue.

Multiple Signatures in a Word Document (ePad)

In Adobe Acrobat and Microsoft Excel, simply creating and signing multiple IntegriSign objects is enough to add multiple signatures to a document. The process is a little more complicated for Word.

Adding Continuous Section Breaks:

Switch to ‘Draft’ view in the lower right corner of Word.

Multiple Signatures in a Word Document 1

Place your cursor where you want to insert a break. For tables, I suggest using the start of a

row, in this case, in front of Assessor, then Employer.

Multiple Signatures in a Word Document 2

Insert Continuous section breaks from the Page Layout > Breaks menu.

Multiple Signatures in a Word Document 3

Review altered document.

Multiple Signatures in a Word Document 4

Please note that, as new versions of Microsoft Office are released, the locations of these menu items may differ. The process, however, remains the same. You may just need to hunt around the menus until you find the commands used here.

ePad Software – What Does What?

We see quite a few queries regarding exactly what each piece of ePad software contains and/or does. To clear that up, here are some deeper descriptions of all of the software available on the ePadsupport.com site.

Universal Installer

This is the driver package which allows all of the ePad models to work under a Windows environment. It also contains control panel configuration utilities for each of the ePads, and the test utility that should be any first step in diagnosing problems with your ePad.

IntegriSign Desktop

This package contains plug-ins for Microsoft Word, Excel, and Adobe Acrobat, as well as all of the various manuals for using the ePad and IntegriSign. This also contains the Software Developers Kit, complete with samples demonstrating several key programming languages and functions, and manuals which will give you all the information you will need to integrate the ePad into your own software.

pDoc Signer

This is a standalone application that does not require IntegriSign to work (although you do still need the ePad drivers installed). It will allow you to edit and complete PDF forms, and sign them using the ePad.

IntegriSign Emcee

This is a corporate application, designed for large numbers of users. It allows a user to create a Signing Ceremony, providing documents to be completed and signed by invited participants. Unlike the other solutions, Emcee does not require a signature pad. It is designed to take advantage of the larger definition of electronic signatures, and allow a signer to ‘sign’ by capturing user data.

Linux Drivers

Currently, ePadLink have drivers for Fedora and Ubuntu Linux. These are for versions 16-20 and 10.04-12 respectively. There are instructions on how to install these on the ePadsupport.com website.

ePad Vision Firmware

These are firmware updates for the ePad Vision device. There is only one online, and should only be required for older model ePad Visions manufactured before November 2011.

IntegriSign – Capturing Cell Data From Excel

Behind every Excel spreadsheet and Word document is a programming interface – VBA (Visual Basic for Applications), a ‘light’ version of Visual Basic designed for constructing macros and functions to run within a document or spreadsheet. It is possible to use VBA to capture data from cells in an Excel spreadsheet, and apply them as user data in an IntegriSign signature object.

The example given below captures data from cells A1-A8 and applies them in order to the 8 different variables possible in IntegriSign’s SetSignerDetailsEx function. This will happen when someone double clicks the signature object to begin the signing process.


Private Sub eSignControl1_DoubleClick()

Dim signername, dept, org, town, county, country, email, location As String

signername = Sheet1.Cells.Item(1, “A”).Value

dept = Sheet1.Cells.Item(2, “A”).Value

org = Sheet1.Cells.Item(3, “A”).Value

town = Sheet1.Cells.Item(4, “A”).Value

county = Sheet1.Cells.Item(5, “A”).Value

country = Sheet1.Cells.Item(6, “A”).Value

email = Sheet1.Cells.Item(7, “A”).Value

location = Sheet1.Cells.Item(8, “A”).Value

eSignControl1.SetSignerDetails signername, dept, org, town, county, country, email, location

End Sub


STU Images – Uploading an image to your STU signature pad

This will teach you how to create STU images, and upload them to your Wacom device.

There are three functions you will need in order to upload an image to your STU signature pad. The first is to select an image from a folder. The second alters the properties of the image in order to make it compatible with the STU pad, and the third is to upload it to the pad itself.

The code below was written in Visual Basic, although should be easily converted to any of the other Visual languages. For more information on Visual Studio, and the programming languages it is compatible with, please follow this link to view the Visual Studio homepage.

First, select the image. This function is created as part of a Button Click event, in this case, btnBrowse.


Private Sub btnBrowse_Click(ByVal sender As System.Object, ByVal e As System.EventArgs) Handles btnBrowse.Click

Dim res

res = OpenFileDialog1.ShowDialog()

If (res = DialogResult.OK) Then

txtFilename.Text = OpenFileDialog1.FileName

DisplayImage(Image.FromFile(OpenFileDialog1.FileName))

End If

End Sub


As you can see, the final line in this function calls the next – DisplayImage. This will process the image into a format that can be displayed by the STU signature pad, then display it in a PictureBox control.


Private Sub DisplayImage(ByVal img As Image)

‘ resize the image to fit the panel

‘ STU displays: 300:396×100 430:320×200 500:640×480 520:800×480 530:800×480

‘ 300/420 scale by 2, else scale by 4. Also handle unexpected size.

Dim scale = 1

If (img.Width > 400) Then

scale = 4

ElseIf (img.Width > Panel1.Width) Then

scale = 2

End If

PictureBox1.Size = New Size(img.Width / scale, img.Height / scale)

‘ don’t exceed the panel size:

If (PictureBox1.Size.Width > Panel1.Size.Width Or PictureBox1.Size.Height > Panel1.Size.Height) Then

PictureBox1.Size = Panel1.Size

End If

‘ centre the image in the panel

Dim x, y

x = Panel1.Location.X + ((Panel1.Width – PictureBox1.Width) / 2)

y = Panel1.Location.Y + ((Panel1.Height – PictureBox1.Height) / 2)

PictureBox1.Location = New Point(x, y)

PictureBox1.SizeMode = PictureBoxSizeMode.StretchImage

PictureBox1.Image = img

PictureBox1.Parent = Me

PictureBox1.BringToFront()

End Sub


Finally, the function needed to upload the image onto the STU pad. Note that this is not a permanent upload. You are not saving the image onto the pad, rather you are sending a screen for the pad to display that just happens to consist of the graphical data of an image file.


Private Sub SendToSTU()

Try

If Connect() <> True Then

Return

End If

print(“Connected: ” + info.modelName)

Dim protocolHelper = New wgssSTU.ProtocolHelper()

Dim encodingFlag As wgssSTU.encodingFlag = 0

Dim encodingMode As wgssSTU.encodingMode = 0

Dim idP = thepad.getProductId()

encodingFlag = protocolHelper.simulateEncodingFlag(idP, encodingFlag)

print(“Encoding flag: ” + encodingFlag.ToString())

If (encodingFlag And wgssSTU.encodingFlag.EncodingFlag_24bit) Then

If (thepad.supportsWrite()) Then

encodingMode = wgssSTU.encodingMode.EncodingMode_24bit_Bulk

Else

encodingMode = wgssSTU.encodingMode.EncodingMode_24bit

End If

ElseIf (encodingFlag And wgssSTU.encodingFlag.EncodingFlag_16bit) Then

If (thepad.supportsWrite()) Then

encodingMode = wgssSTU.encodingMode.EncodingMode_16bit_Bulk

Else

encodingMode = wgssSTU.encodingMode.EncodingMode_16bit

End If

Else

‘ assumes 1bit is available

encodingMode = wgssSTU.encodingMode.EncodingMode_1bit

End If

print(“encodingMode: ” + encodingMode.ToString())

Dim bitmapData  ‘// This is the flattened data of the bitmap that we send to the device.

Dim stream As New System.IO.MemoryStream()

PictureBox1.Image.Save(stream, System.Drawing.Imaging.ImageFormat.Png)

bitmapData = protocolHelper.resizeAndFlatten(stream.ToArray(),

0, 0, 0, 0, cap.screenWidth, cap.screenHeight, CByte(encodingMode), wgssSTU.Scale.Scale_Fit, False, 0)

thepad.writeImage(encodingMode, bitmapData)

Disconnect()

Catch ex As Exception

print(“Exception: ” + ex.Message)

End Try

End Sub


IntegriSign FAQs

Q-Is it possible to remove the IntegriSign Desktop watermark that appears behind a signature object?

A-Yes. In the IntegriSign Desktop Configuration utility, simply uncheck the ‘Logo’ box. This will prevent the IntegriSign watermark from appearing behind the signature. Alternatively, this can be done on a case-by-case basis when using signer profiles. In this case, leave the box mentioned above checked, but when creating a signer profile, you can uncheck the logo box in that window instead. Then, whenever you use that particular profile, the logo will not appear.


Q-Can I use my own logo for a watermark?

A-Yes. In the application ‘IntegriSign Desktop – Configuration’, one of the options is to set the ‘Background Logo’. You can select the file you wish to use for the background there. When creating a new file to use for this background image, remember to resize the image so it is the same dimensions as your signature objects (default 110×180).


Q-During the signing process, exactly what biometric data is captured?

A-For each signature point, the x-axis position, the y-axis position, the pressure and the time is captured. Having the time captured allows IntegriSign to determine the velocity of a stylus during signing.


Q-How does content hashing work?

A-Hashing is the term used when signing a document to verify it has not been tampered with. When you sign a document, for all intents and purposes, the entire contents of that document is your Hashdata. When you later go and attempt to verify a signature in that signed document, the Hashdata is checked against the information stored in the signature data, and if the document contents have not changed, the signature will be verified.

SignPro generates a Java error message (or does nothing at all) when I try to launch it.

This problem likely occurs due to incorrect versions of files being installed. It happens when a user has both SignPro, and the Signature SDK installed simultaneously.
The key to correcting this issue is simply to install them in the correct order.
First of all, go to your Control Panel > Apps & Features (Features & Programs in earlier versions of Windows) > Uninstall SignPro PDF and Wacom Signature SDK.
Once the uninstalls are complete, restart your computer, then reinstall SignPro first, then the Signature SDK.
This should resolve your problem, but if not, please contact us for further assistance.

Troubleshooting Your ePad-Ink

Today we’re looking at how to troubleshoot your ePad-Ink, and some of the common problems people face with the device. We’ll show you the common issues and show you how to troubleshoot your ePad-Ink back to full health.

Accessing the ePad-Ink Test Utility

If you are having trouble with the ePad-Ink, the driver suite contains a test utility.

To access this utility:

Go to Start > Programs > EpadLink > ePad > Generic ePad Test Utility.

This will allow you ensure the ePad-Ink device is working correctly.

A note about signing:

When signing on the ePad‐Ink, try not to lean your hand too heavily on the ePad‐Ink around the signing area as this can apply pressure to the sensors under the screen and give an inaccurate signature.

A note about USB ports:

Most modern desktop computers have USB ports on the front and back of the machine. The USB ports on the back of the machine carry more power than those on the front, so if you have an ePad‐ Ink plugged into the front of your computer and you are experiencing problems, try moving it to a USB port on the back of your computer instead. That might be enough to get it working.

Your ePad is not allowing you to sign

When you start the signing process, if you receive the error message “ePad device could not be initialized”, then read this.

There is a problem with the connection between the ePad‐Ink and your computer. Click ‘Cancel’; unplug the ePad‐Ink from your computer, and plug it back in. Try to sign the document again, and if it still doesn’t work, try the ePad‐Ink in a different USB port. If you are still unable to get the ePad‐Ink working (especially if this is the first time you have used it), there may be problems with the drivers. It is recommended to uninstall and reinstall them. Please note, you should reinstall IntegriSign after reinstalling the drivers.

There is no display on the ePad‐Ink screen

Check the connection between the computer and the ePad‐Ink. If there is still no display, try a different USB port. If you are still unable to get a display on the ePad‐Ink, try checking the brightness dial on the back edge of the unit (just above where the cable is attached).

The LCD screen goes dark.

If the LCD screen is dark when you plug the ePad‐Ink into the computer, check the brightness dial on the back of the unit.

The stylus/tether has broken. How do I replace it?

You can order packs of 3 replacement styli from Steadlands. The stylus is easily replaced by unscrewing where it is tethered to the underside of the ePad‐Ink, replacing the stylus, and screwing it back into place.

My computer tells me the ePad‐Ink is plugged in and working, but I do not get a signature on my screen when I try to sign.

There might be a problem with the connection between ePad‐Ink and computer. Try a different USB port. If it still doesn’t work, try the ePad‐Ink with the Generic Test Utility (See above). If you do not get a signature on the test utility, try using a different ePad‐Ink.

There are vertical lines appearing on the ePad‐Ink screen.

This is a hardware issue. There is pressure being applied to the screen somewhere. Has the unit been dropped at all? Check the screen for signs of damage and clean it using a soft cotton cloth and isopropyl alcohol. If you are using a screen protector, replace it.

Jagged lines appear on the screen when I try to sign.

This could be caused by there being pressure applied to the sensor behind the screen by something other than the stylus. Usual causes are the ePad‐Ink has been dropped and something inside is pressing against the back of the screen. Alternatively, this could be caused by something as simple as the signer not applying enough pressure to the screen. Try pressing a little harder while signing.

The screen got scratched.

Hopefully the scratch isn’t too bad. If your ePad-Ink still works without a problem, I recommend purchasing a pack of Screen Protectors to help avoid further damage in future.

On the other hand, if your ePad-Ink has stopped working, you will need either a replacement screen, or replacement ePad‐Ink. Given the cost of the replacement parts and shipping to the manufacturer for refitting, it will be much easier, faster and not much more expensive to buy a new ePad.


I can’t click on any on ‐ screen buttons.

When you try to click a button on the ePad‐Ink display and it is not detecting the click when you touch the screen, there could be pressure being applied elsewhere on the screen (or on the case surrounding the screen). Try clicking again, making sure no part of your hand is touching the rest of the ePad‐Ink unit. If it still doesn’t detect the click in the right place, try using a different ePad‐Ink.

If you are still having problems after following our troubleshoot your epad-Ink guide please contact our technical support department by emailing [email protected] or calling us on +44 (0)1670 361 261