This problem likely occurs due to incorrect versions of files being installed. It happens when a user has both SignPro, and the Signature SDK installed simultaneously.
The key to correcting this issue is simply to install them in the correct order.
First of all, go to your Control Panel > Apps & Features (Features & Programs in earlier versions of Windows) > Uninstall SignPro PDF and Wacom Signature SDK.
Once the uninstalls are complete, restart your computer, then reinstall SignPro first, then the Signature SDK.
This should resolve your problem, but if not, please contact us for further assistance.
Barry Craik
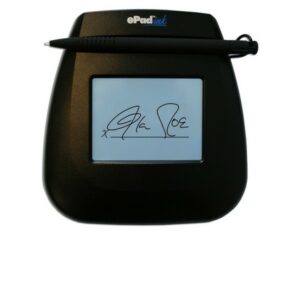
Troubleshooting Your ePad-Ink
Today we’re looking at how to troubleshoot your ePad-Ink, and some of the common problems people face with the device. We’ll show you the common issues and show you how to troubleshoot your ePad-Ink back to full health.
Accessing the ePad-Ink Test Utility
If you are having trouble with the ePad-Ink, the driver suite contains a test utility.
To access this utility:
Go to Start > Programs > EpadLink > ePad > Generic ePad Test Utility.
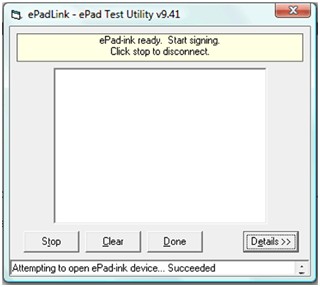
This will allow you ensure the ePad-Ink device is working correctly.
A note about signing:
When signing on the ePad‐Ink, try not to lean your hand too heavily on the ePad‐Ink around the signing area as this can apply pressure to the sensors under the screen and give an inaccurate signature.
A note about USB ports:
Most modern desktop computers have USB ports on the front and back of the machine. The USB ports on the back of the machine carry more power than those on the front, so if you have an ePad‐ Ink plugged into the front of your computer and you are experiencing problems, try moving it to a USB port on the back of your computer instead. That might be enough to get it working.
Your ePad is not allowing you to sign

When you start the signing process, if you receive the error message “ePad device could not be initialized”, then read this.
There is a problem with the connection between the ePad‐Ink and your computer. Click ‘Cancel’; unplug the ePad‐Ink from your computer, and plug it back in. Try to sign the document again, and if it still doesn’t work, try the ePad‐Ink in a different USB port. If you are still unable to get the ePad‐Ink working (especially if this is the first time you have used it), there may be problems with the drivers. It is recommended to uninstall and reinstall them. Please note, you should reinstall IntegriSign after reinstalling the drivers.
There is no display on the ePad‐Ink screen
Check the connection between the computer and the ePad‐Ink. If there is still no display, try a different USB port. If you are still unable to get a display on the ePad‐Ink, try checking the brightness dial on the back edge of the unit (just above where the cable is attached).
The LCD screen goes dark.
If the LCD screen is dark when you plug the ePad‐Ink into the computer, check the brightness dial on the back of the unit.
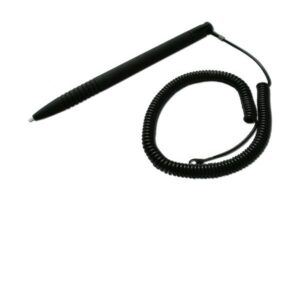
The stylus/tether has broken. How do I replace it?
You can order packs of 3 replacement styli from Steadlands. The stylus is easily replaced by unscrewing where it is tethered to the underside of the ePad‐Ink, replacing the stylus, and screwing it back into place.
My computer tells me the ePad‐Ink is plugged in and working, but I do not get a signature on my screen when I try to sign.
There might be a problem with the connection between ePad‐Ink and computer. Try a different USB port. If it still doesn’t work, try the ePad‐Ink with the Generic Test Utility (See above). If you do not get a signature on the test utility, try using a different ePad‐Ink.
There are vertical lines appearing on the ePad‐Ink screen.
This is a hardware issue. There is pressure being applied to the screen somewhere. Has the unit been dropped at all? Check the screen for signs of damage and clean it using a soft cotton cloth and isopropyl alcohol. If you are using a screen protector, replace it.
Jagged lines appear on the screen when I try to sign.
This could be caused by there being pressure applied to the sensor behind the screen by something other than the stylus. Usual causes are the ePad‐Ink has been dropped and something inside is pressing against the back of the screen. Alternatively, this could be caused by something as simple as the signer not applying enough pressure to the screen. Try pressing a little harder while signing.
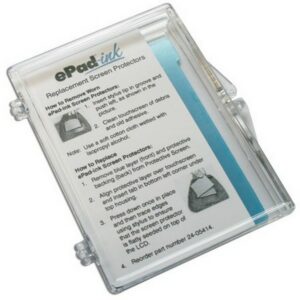
The screen got scratched.
Hopefully the scratch isn’t too bad. If your ePad-Ink still works without a problem, I recommend purchasing a pack of Screen Protectors to help avoid further damage in future.
On the other hand, if your ePad-Ink has stopped working, you will need either a replacement screen, or replacement ePad‐Ink. Given the cost of the replacement parts and shipping to the manufacturer for refitting, it will be much easier, faster and not much more expensive to buy a new ePad.
I can’t click on any on ‐ screen buttons.
When you try to click a button on the ePad‐Ink display and it is not detecting the click when you touch the screen, there could be pressure being applied elsewhere on the screen (or on the case surrounding the screen). Try clicking again, making sure no part of your hand is touching the rest of the ePad‐Ink unit. If it still doesn’t detect the click in the right place, try using a different ePad‐Ink.
If you are still having problems after following our troubleshoot your epad-Ink guide please contact our technical support department by emailing [email protected] or calling us on +44 (0)1670 361 261
Finding NEMA – A Guide to Hazardous Ratings
Hazardous ratings – NEMA ranks, ATEX certifications, FM approvals, and CE labels on everything – all are ratings designed to increase the safety of people working in hazardous environments. But what do they all mean?
NEMA
Let’s start with the NEMA ratings. NEMA stands for the National Electrical Manufacturers Association, and they are the organisation that decided to categorize cases and enclosures for electrical equipment to allow a purchaser to know exactly what the contents will be protected against. The NEMA ratings are primarily for use in the USA, although they will give any buyer a good idea of what to expect.
NEMA ratings are given to electrical enclosures and containers, depending on what they are resistant to, or insulated from. They range from a rating of 1 up to 13, with a number of options available along the way.
NEMA 1 is a general purpose enclosure. It protects against dust, light, and indirect splashing, but is not sealed. NEMA 1 is best used indoors, and under normal conditions.
NEMA 2 is similar, but the enclosure has been designed to be drip-tight. Again, best suited for use indoors, but where condensation is higher – laundry rooms, or bathrooms, for example.
NEMA 3 is considered weather-resistant. It is used outdoors, mostly in construction work, tunnels, or subways, and protects the contents from rain, snow, sleet, and ice.
NEMA 3 has a couple of variations, indicated by letters after the number. NEMA 3R is the same as 3, but does not include wind-blown dust protection. 3S is again, the same as 3, but is still operable when covered in ice. Adding an X onto the rating (so, 3RX, 3X, or 3SX) indicates the enclosure has additional protection against corrosion, usually used near salt water.
NEMA 4 is watertight. Testing for this means the enclosure must exclude at least 65 GPM (gallons per minute) of water from a 1-inch nozzle, delivered from a distance of no less than 10 feet, for 5 minutes. Unsurprisingly, it is generally used for outdoor areas near water. Again, an X can be applied to this rating if the enclosure is treated for extra corrosion protection.
NEMA 5 is dust-tight. These are typically used in steel mills or cement plants.
NEMA 6 comes in two variations, 6 and 6P. NEMA 6 is watertight and can be submerged for small amounts of time. 6P can be submerged for prolonged periods of time, although neither are designed for continuous submersion.
NEMA 7, 8, and 9 ratings are given to devices designed and certified for use in locations with specific environmental hazards. These all correspond with standards produced by the US National Fire Protection Association.
NEMA 10 meets the requirements of the Mine Safety and Health Administration.
NEMA 11 is assigned to enclosures that protect the contents from the effects of corrosive liquids and gas.
NEMA 12 and 12K rated enclosures protect against dust, dirt, and dripping noncorrosive liquids.
NEMA 13 is designed to protect against dust, the spraying of water, and noncorrosive coolants.
ATEX
The ATEX Directive is EU legislation regarding the safety of equipment in explosive environments, and is actually based on two EU directives, one for the manufacturer, and one for the end user. The directives demand that an employer designate relevant areas of their workplace into Zones depending on what environmental hazard or explosive source is present.
Zone 0 is for an area in which an explosive mixture is present all or most of the time. In North American classifications, this is Calls 1, Division 1 (Gases).
Zone 1 is a region where an explosive mixture is likely to be present during normal operations. This also falls under Call 1 Division 1 in North America.
Zone 2 ratings are given to areas which can gather an explosive mix during normal operations, but one that will only persist for a short length of time. In the US, this classification is Class 1, Division 2 (gases).
Zones 0-2 are for gaseous or vaporous explosive materials. Zones 20, 21, and 22 are the same as the above, only for dust instead of gases, and translate to the US standards of Class 2 Division 1, Class 2 Division 1, and Class 2 Division 2 respectively.
FM Approvals
An FM Approval rating on an item means that it has gone through rigorous testing at FM Global’s Research Campus in West Glocester, R.I., in the United States. Here they test a product in hazardous conditions including both fire and explosive hazards. An FM Approval rating means the item in question passed all of their tests.
CE Labels
Products with a CE label on them have been thoroughly tested and approved for shipping, sale, and consumption within the European Economic Area. It is implied that any CE marked products are compliant with any regulations or laws that apply to that field. For example, on an industrial machine, the CE marking means it complies with any regulations within the EU which apply to a device of that type. For example, plugs and sockets for domestic use are required to comply with the “Low Voltage” directive, and any that do not carry the CE mark will not be.
IP Codes
Codes such as IP67 and IP68 refer to the amount of protection a product has against both solids and liquids, with the first number being against solids, and the second, liquids. The ratings for solids range from 0 to 6, with zero being there is no protection against deliberate contact, through to six being the product is protected against dust.
The second number refers to waterproofing, and ranges from 0 to 8. Zero offers no protection against water. Rating One covers protection from vertically dripping water, but that’s it, where at the other end of the scale, rating 8 covers complete immersion in a body of water beyond a depth of 1m.
What are eSignatures?
The term esignatures can cover many different options, and is synonymous with phrases like electronic signatures, or digital signatures. They all cover any service or technology that allows you to apply a unique signature or stamp to a document or service. This can be constructed from available data (your IP address, for example), or can be generated using a signature capture device.
The most common form of electronic signature that people will be familiar with are the pads carried by couriers and delivery drivers, and used by a recipient to sign for the delivery of a parcel. These are simple devices, designed to capture your signature on a simple LCD screen, and save it as an image which can then later be queried and displayed on a website as proof of delivery.
Then there are services that claim to provide you with a digital signature. This signature is nothing more than a collection of data that, when gathered, is meant to prove that you were the person to submit the ‘signed’ document. This usually consists of your name, the date and time, the IP address where the ‘signature’ was captured, as well as a few other pieces of information depending on the signature service you are using. While not exactly a signature like the ones we are used to, this is nevertheless still legally binding as all of the data compiles to provide a unique identifier for the signer.
Here at Steadlands, we provide signature solutions that are more secure than the devices carried by delivery drivers, and more personal than the data collected by digital signature services. Our products allow you to securely apply your own, personal, handwritten signature into an electronic document. This can be done in Microsoft Word or Excel, or you can sign PDF documents with Adobe Acrobat, or using one of our PDF signing applications. While the majority of our hardware solutions were designed for use in Windows, we also support Linux operating systems, and will include Mac systems as of early 2016. We are also branching out into alternative signing solutions for mobile and tablet signature capture, currently available for the iPad range.
Creating a Signing Profile in IntegriSign for Regular Signers
If you are someone who will be signing documents regularly, you may wish to consider creating a profile. This will make your name (or profile ID) appear automatically in the Signature Information window, and allow you to have more details stored in the signature object; for example, organisation and department, email address. To create a profile, follow these instructions.
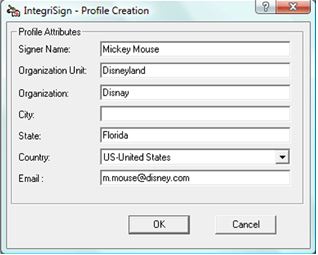
Go to Start > All Programs > IntegriSign Desktop > Desktop > Preferences Manager. The following window appears.
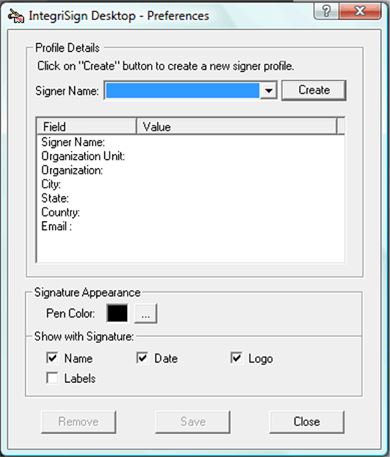
Click ‘Create’ and fill in the required details. Click ‘OK’.
Once your profile is created, you can select what colour your signature appears in when you sign a document, and what additional information is shown as a label on the signature object (ie. Date/Time/Signer Name). When you have finished in the Preferences Manager, click ‘Save’ to finalise your profile.
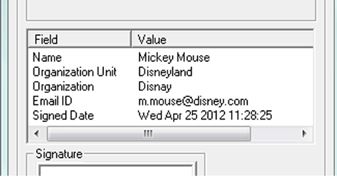
Now, when you go to sign a document or spreadsheet, this is what the Signature Information window will look like this.

The name in the box can easily be overwritten without deleting the existing profile, if someone other than the named person wishes to use the same PC to sign a document.
If you sign a document with a completed profile, then verify the signature, you will be able to see additional details for the signer in the verification window.
Signing Certificates in SignPro
Once a year, SignPro will present you with an error. This is nothing to do with any problems with the application, but rather a natural expiry date on signing certificates. It is nothing to worry about, and is very simple to fix. Just follow these simple instructions.
Go to the directory: C:\Users\[your login name]\AppData\Roaming\Wacom\signpro
Delete all the files inside this directory.
Close SignPro and restart it – it should now prompt you to create a new key.
Once this is done, you should see the error disappear for another year.
Caring for your ePads
ePads are very durable and will last for many years. Proper care and maintenance, however, will better guarantee the reliability and performance of your ePads over their lifetime.
The only periodic maintenance your ePadLink signature pad requires is to keep it clean. A dirty pad surface may interfere with moving your stylus smoothly across the surface and can make it hard to capture thumb- and fingerprints.
Users should be aware that they should just sign normally, with firm stylus pressure. Never use any object (such as a pen) to perform signing, always use the provided stylus.
Environmental:
-Never leave ePads exposed to the sun for long periods of time. If you keep a pad locked in a car on a hot day, leave a window cracked to help with ventilation and keep the pad in a carrying case or shaded area of the vehicle.
-Keep the ePad surface away from other objects – such as the USB connector. Do not allow objects to press against the signature pad area when storing or transporting the device.
To clean the pad, follow these guidelines:
-Use any mild liquid household cleaner or rubbing alcohol.
-Apply a small amount of cleaner to a soft, non-abrasive cloth and wipe the pad or sensor.
-Be sure to wipe all cleaner residue from the device.
-Allow the alcohol to evaporate normally.
CAUTION:
-Do NOT pour cleaner or alcohol directly onto the device. Apply the cleaner to a soft cloth first.
-NEVER use De-Natured Alcohol. This will damage the device.
-PREVENT any liquid from entering inside the unit.
-Be careful to not scratch the fingerprint sensor surface.
eSignature Legislation
While working with electronic signature pads, we are often asked about legality, and whether an electronic signature would stand up against its pen and paper counterpart in a court of law. To help relieve these concerns, we went and collected as much of the world’s legislation on electronic commerce, transactions, and signatures as we were able to find. Please note that our collection is subject to change, and is by no means exhaustive. Where possible, we will provide a PDF in English, but that has not been possible for all of the laws listed here, so you will find some of them in their native tongue.
Most of the world’s esignature legislation is based around the UN’s Commission on International Trade Law’s (UNCITRAL) Model Law on eCommerce, which we also have available. If you would like a copy of any of the below documents, please contact us. Please note that all of the countries listed have their own laws, but where multiple laws which affect esignature legislation exist, we have named both the country, and the act of Government in question. For example, the UK has the Electronic Communications Act, the Electronic Agreements Order, and the Electronic Signature Regulations document.
UNCITRAL Model Law on eCommerce
EU – Directive on eSignatures
UK – Electronic Communications Act
UK – Electronic Agreements Order
UK – Electronic Signature Regulations
USA – eSIGN Act
USA – eSIGN Consumer Consent Provision
USA – Uniform Electronic Transactions Act
Albania
Argentina – Digital Signature Law
Argentina – Decree 2628-02
Argentina – Decree 724-06
Armenia
Australia – Electronic Transactions Act
Australia – New South Wales Electronic Transactions Bill
Australia – Victoria Electronic Transactions Act
Australia – Western Australia Electronic Transactions Bill
Austria
Azerbaijan
Bahamas
Barbados
Belgium
Belize
Brazil
Bulgaria
Canada – Electronic Signature Regulations
Canada – Personal Information Protection and Electronic Documents Act
Canada – Secure Electronic Signature Regulations
Chile
China
Colombia
Costa Rica
Croatia
Cyprus
Czech Republic
Denmark
Dominican Republic
Ecuador
Egypt
Estonia
Finland
France
Germany – eSignature Act
Germany – Framework Law for eSignatures
Greece
Guatemala
Hungary
Iceland
India
Ireland
Italy
Jamaica
Japan
Korea
Latvia
Liechtenstein – eSignature Law
Liechtenstein – Regulation on Electronic Signatures
Lithuania
Luxembourg
Macedonia
Malaysia
Malta
Mauritius
Montenegro
Myanmar
Netherlands
New Zealand
Norway
Pakistan
Panama
Peru
Philippines
Poland
Portugal
Romania
Russia
Samoa
Saudi Arabia
Serbia
Singapore
Slovakia
Slovenia
South Africa
Spain
St Vincent
Sweden
Switzerland
Thailand
Turkey
Ukraine
Uruguay
Venezuela
Vietnam
Based on England’s North East coastline and in operation since 1993, Steadlands represent and distribute for some of the industries largest and most respected names in the Electronic Component, Automotive Technology and Information Technology Sectors.
Contact Us